How to install ODBC driver for Oracle in Windows 7
First of all, you need to download proper files:
– here is the link for Instant Client Downloads for Microsoft Windows (32-bit), for ODBC, you need instantclient-basic-nt-11.2.0.3.0.zip and instantclient-odbc-nt-11.2.0.3.0.zip files (Oracle 11.2.0.3 version)
– here is the link for Instant Client Downloads for Microsoft Windows (x64), for ODBC, you need instantclient-basic-windows.x64-11.2.0.3.0.zip and instantclient-odbc-windows.x64-11.2.0.3.0.zip files (Oracle 11.2.0.3 version)
Which version to choose – 32-bit or 64-bit?
Well, I think the best way to answer this question is to describe my situation. I need to get data from Oracle to Excel. I have on my PC: Windows 7 – 64-bit version, 64-bit Oracle client already installed but MS Office in 32-bit version. So in my situation I had to choose 32-bit ODBC driver. Generally, you choose ODBC driver version based on tool version, that you use to get data from Oracle database.
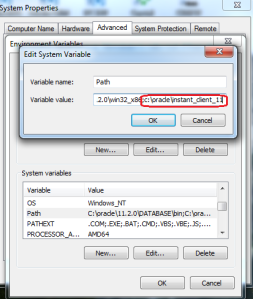
Anyway, both downloaded files, you need to unzip to THE SAME folder (for example: c:\oracle\instant_client_11), then add the folder to the PATH environment variable:

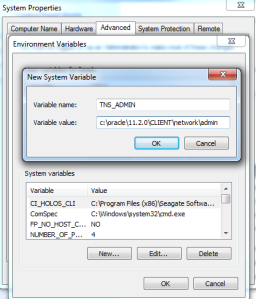
Then add the TNS_ADMIN environment variable indicating the path to the tnsnames.ora file (in my PC it is c:\oracle\11.2.0\CLIENT\network\admin):

Next, open the command line (Run as administrator) and go to the folder where you unzip ODBC driver, in my case:
1
| cd c:\oracle\instant_client_11 |
1
| odbc_install.exe |
1
| Oracle ODBC Driver is installed successfully. |
This is because you use 64-bit ODBC administration panel. If you install 32-bit ODBC driver, you’ll need to use 32-bit ODBC administration panel – run odbcad32.exe from c:\windows\SysWOW64.
So, on the list, choose instant_client_11, then Finish and then in the configuration window add proper data in the Data Source Name, Description, TNS service name (from tnsnames.ora) and User ID.
Then, you can test connection and when everything is correct, save the connection, close ODBC window and enjoy your Oracle data in MS Office tools :)
No comments:
Post a Comment